If you’re looking to expand your raspberry patch without spending a dime, division is the answer. I’ve been propagating raspberries this way for years, and it’s surprisingly straightforward once you understand the basics.
Raspberries are vigorous growers that naturally spread through underground runners, producing what gardeners call “suckers” or “daughter plants.” These young shoots make perfect candidates for transplanting, giving you free plants that are identical to your parent stock.
Selecting the Right Time
The best time to divide raspberry plants is during their dormant season – either in early spring before new growth emerges or in late fall after leaves have dropped. Spring division gives plants the entire growing season to establish themselves, while fall division works well in areas with mild winters.
I prefer early spring division when the soil is workable but before buds break dormancy. This timing reduces transplant shock and gives your divisions the maximum growing time before they need to survive winter.
My experience has taught me to avoid dividing raspberries during the growing season when they’re actively putting on growth or fruiting. Summer divisions are significantly more stressed and require much more aftercare to survive.
What You’ll Need
- Garden fork or shovel (a garden fork works best as it’s less likely to slice through roots)
- Sharp pruners or garden knife
- Watering can or hose
- Compost or aged manure
- Mulch (straw works wonderfully)
- Wheelbarrow or tarp (optional)
- Garden gloves (raspberries have small prickles that can irritate bare hands)
- Plant markers (if dividing different varieties)
Step 1: Identify Healthy Suckers
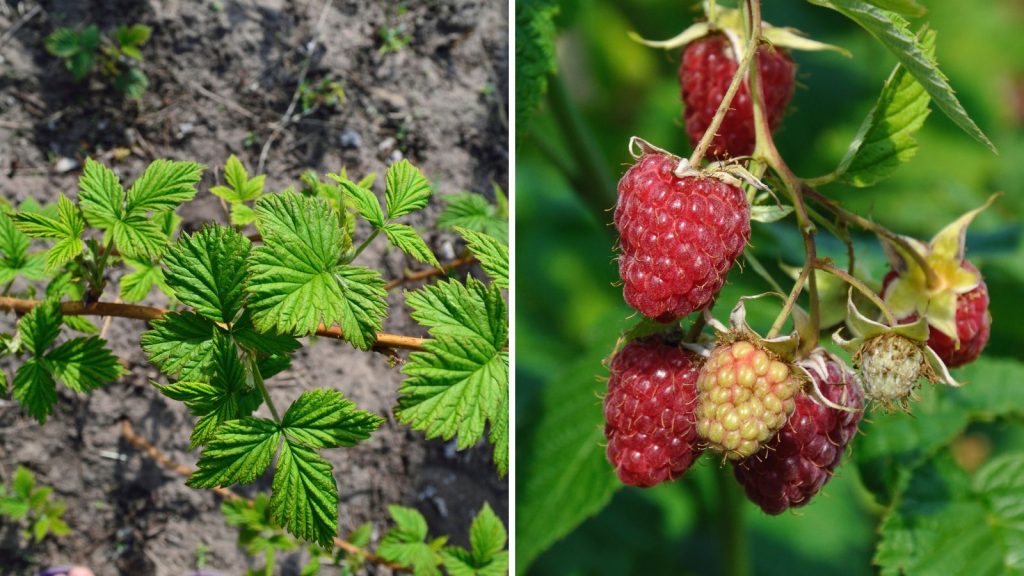
Look for young, vigorous suckers growing 6-12 inches away from the main raspberry canes. Ideal candidates are 6-10 inches tall with healthy root systems. These suckers are actually individual plants connected to the mother plant through horizontal underground stems called rhizomes.
The best divisions come from healthy, disease-free parent plants. Skip any suckers that show signs of discoloration, spots, or stunted growth.
During my first few years dividing raspberries, I learned that the youngest suckers (under 4 inches tall) often don’t have sufficient root development to survive transplanting. Similarly, older suckers that have already produced fruit are less vigorous after transplanting. The sweet spot is those mid-sized, first-year suckers that haven’t yet fruited.
Step 2: Prepare the Planting Area
Before digging up your divisions, prepare their new home. Raspberries thrive in well-drained, fertile soil with plenty of organic matter. Work in compost or aged manure to a depth of 8-10 inches.
For best production, choose a location with full sun (at least 6 hours daily) and protection from strong winds. If planting in rows, space them 6-8 feet apart to allow for good air circulation, which reduces disease pressure.
Soil pH matters for raspberries – they prefer slightly acidic soil between 5.5 and 6.5. If you’re working with heavy clay soil, consider creating raised beds or mounding the soil to improve drainage. Raspberries absolutely hate wet feet, and poor drainage is one of the main reasons for failure when establishing new plants.
Step 3: Water Thoroughly
A day before dividing, water your raspberry patch thoroughly. This helps reduce transplant shock and makes the soil easier to work with. Well-hydrated plants are more resilient during the division process.
If you’re dividing in early spring when the ground is already moist from winter precipitation, you might be able to skip this step, but I still recommend checking soil moisture before proceeding.
Step 4: Dig and Separate
Using a garden fork or shovel, carefully dig around the sucker about 6-8 inches from its base. Work slowly to avoid damaging the root system. Gently pry upward, leveraging the fork to lift the sucker along with its roots and the connecting rhizome.
Once lifted, you’ll need to separate the sucker from the parent plant. Use sharp pruners to cut the horizontal rhizome that connects them. Each division should have at least 3-4 inches of rhizome attached and several healthy roots.
This is where many gardeners go wrong – digging too close to the sucker and damaging the main root system, or not getting enough of the rhizome with each division. The rhizome contains stored energy that helps the new plant establish itself, so don’t be stingy with it.
If you’re dividing multiple suckers at once, consider placing them on a damp towel or in a bucket with a small amount of water to prevent the roots from drying out while you work.
Step 5: Trim the Canes
After separating your divisions, trim the top growth to about 6 inches. This might seem drastic, but it reduces moisture loss and encourages the plant to focus energy on establishing roots rather than supporting excessive foliage.
I’ve found that many gardeners skip this crucial step because they’re reluctant to cut back what looks like healthy growth. Trust me on this one – your divisions will recover faster and produce stronger plants if you reduce the top growth during transplanting.
For summer-bearing varieties (floricanes), you’re essentially creating a first-year primocane that will grow vegetatively this season and produce fruit the following year. For ever-bearing varieties (primocanes), your division might produce a small fall crop in its first year if it establishes well.
Step 6: Plant Immediately
Raspberry roots dry out quickly, so plant your divisions as soon as possible after digging them up. Dig a hole wide enough to accommodate the roots without bending them. Place the division in the hole with the roots spread outward and downward.
The planting depth is critical – set the division at the same depth it was growing originally. The crown (where the stem meets the roots) should be just at soil level. Firm the soil gently around the roots to eliminate air pockets.
One mistake I’ve observed is planting raspberry divisions too deeply. Unlike some perennials that benefit from deep planting, raspberries prefer their crowns right at soil level. Plant too deeply, and your divisions may rot or struggle to emerge.
Step 7: Water and Mulch
Water your newly planted divisions thoroughly, providing about 1 inch of water. Then apply a 2-3 inch layer of mulch around the plants, keeping it a few inches away from the stems. Straw makes excellent mulch for raspberries, helping retain moisture and suppress weeds.
Avoid piling mulch against the canes, as this can cause rot and create habitat for pests. Instead, create a donut of mulch around each plant, with a few inches of bare soil immediately around the stem.
Step 8: Provide Aftercare

For the first two weeks, check your divisions daily and water as needed to keep the soil consistently moist but not waterlogged. Young divisions need reliable moisture to establish new roots.
Don’t expect fruit the first year after division – your new plants need time to develop. Removing any flower buds that appear the first season will help the plant direct energy toward establishing strong roots and canes.
By the second year, your divisions should be well-established and beginning to produce fruit. Within three years, they’ll reach full productivity – and you’ll be looking for more garden space to accommodate their own suckers!
Common Mistakes to Avoid
Taking Divisions From Unhealthy Plants
I learned this lesson the hard way – diseased parent plants pass their problems to their offspring. Raspberry plants can harbor viruses and fungal diseases that aren’t immediately obvious. If your established raspberries have been underperforming, producing small fruits, showing leaf discoloration, or declining over time, don’t propagate them. Start fresh with certified disease-free plants instead.
Divisional Timing Troubles
Dividing raspberries during hot weather or when they’re actively fruiting puts tremendous stress on both the parent plant and the divisions. I’ve seen gardeners try mid-summer divisions during a heatwave, and the results are rarely worth the effort. Stick to dormant-season division for the highest success rate.
Ignoring Soil Preparation
Some gardeners get excited about free plants and skip proper soil preparation. Then they wonder why their divisions struggle or produce poorly. Raspberries are heavy feeders that need fertile, well-drained soil to thrive. The time spent improving your soil before planting will pay dividends for years.
Insufficient Watering After Division
New divisions don’t have extensive root systems to seek out water. Even if you’re normally a hands-off gardener, newly divided raspberries need consistent moisture for at least the first month after planting. Set a reminder if necessary – checking moisture levels every couple of days is not excessive during the establishment period.
Crowding New Plants
It’s tempting to plant your divisions close together, especially if you have limited space. However, crowded raspberries are more susceptible to fungal diseases and produce smaller harvests. Give each division room to grow – they’ll fill in the space quickly enough on their own.
Mixing Up Varieties
If you’re growing multiple raspberry varieties, it’s surprisingly easy to mix them up during division if you don’t label carefully. I once accidentally interplanted summer-bearing and fall-bearing varieties, which created a maintenance nightmare when it came to pruning. Use durable labels and keep good records of what’s planted where.
Troubleshooting Division Problems
Yellowing Leaves on New Divisions
If your newly planted divisions develop yellowing leaves, several factors might be at play:
- Overwatering: Despite needing consistent moisture, raspberries hate soggy soil. Check drainage and reduce watering if the soil stays wet for extended periods.
- Nutrient deficiency: Yellow leaves with green veins often indicate iron chlorosis, common in alkaline soils. A foliar application of liquid iron can help in the short term, while soil amendments like elemental sulfur can gradually lower pH.
- Transplant shock: Some yellowing is normal after division. If the plant otherwise looks healthy and is putting on new growth, it will likely recover on its own.
Wilting Despite Adequate Water
When new divisions wilt even with proper watering, root damage is the likely culprit. This can happen if the roots dried out during the division process or if the plant was divided during hot weather. Create shade for the plant with a temporary cover and prune back additional top growth to reduce transpiration demands until new roots develop.
No New Growth After Division
If your division shows no signs of growth within 3-4 weeks of planting, carefully dig up a small section of soil near the stem to check root development:
- White, firm roots indicate the plant is alive but slow to break dormancy. Be patient.
- Brown, mushy roots mean root rot has set in, often due to poor drainage. The division might not survive.
- No visible roots at all could indicate that the division didn’t have enough viable root tissue to begin with. In this case, it’s usually best to replace it with a new division.
Divisions Growing But Not Thriving
Sometimes divisions will grow but seem weak or spindly. This often indicates:
- Insufficient sunlight: Raspberries need full sun to produce strong canes. If your planting site receives less than 6 hours of direct sunlight, consider relocating to a sunnier spot.
- Poor soil fertility: Apply a balanced organic fertilizer in spring and a layer of compost in fall to build soil health.
- Competition from weeds: Young raspberries cannot compete effectively with established weeds. Maintain a weed-free zone at least 1 foot in diameter around each division.
Animal Damage to New Divisions
Newly planted raspberries are particularly vulnerable to wildlife damage:
- Deer and rabbits may browse the tender new growth. Temporary fencing or repellents can help protect plants until they’re established.
- Voles and mice sometimes chew on the base of canes or roots during winter. Keeping mulch pulled back slightly from the crowns can reduce habitat for these pests.
Suckers Appearing Far From Planting Site
Raspberries are notorious for sending up suckers far from the original planting. This isn’t necessarily a problem – it’s just how raspberries grow – but it can be surprising when shoots appear in your lawn or neighboring beds. For contained raspberry growing, consider installing deep rhizome barriers (12-18 inches deep) around your raspberry patch or growing in large containers.
When to Take a Different Approach
While division is an excellent way to expand your raspberry patch, sometimes other propagation methods are more appropriate:
- For summer-bearing (floricane) varieties: Tip layering can sometimes be more successful than division. Bend a flexible cane tip to the ground in late summer, cover it with soil, and it will root by spring.
- For very old patches: If your raspberry patch is more than 8-10 years old, divisions may carry accumulated diseases or depleted vigor. Consider starting fresh with certified disease-free plants instead.
- For specific varieties: If you’re trying to maintain the exact characteristics of a named variety, division is ideal. But if you’re just looking to fill a raspberry patch and don’t mind some variation, allowing natural suckers to establish wherever they appear might be the lowest-effort approach.
Dividing raspberries is a wonderfully satisfying process that turns one plant into many. With minimal investment besides your time, you can create an abundant raspberry patch that will reward you with sweet, juicy berries for years to come. The key is understanding the plant’s growth cycle and working with its natural tendencies rather than against them.
By avoiding common mistakes and knowing how to troubleshoot problems when they arise, you’ll be well on your way to raspberry propagation success. And once you master the art of division, you’ll never need to purchase raspberry plants again!

James is a former logistics coordinator and wilderness safety instructor, whose practical experience taught him the value of sensible preparedness and calm resilience. Passionate about self-reliance, James teaches everyday skills—like water purification, emergency communication, and outdoor safety—to help people confidently handle life's disruptions without fear or overwhelm. His approachable style combines real-world insights with relatable, personal stories and experiences.